

The new Block Editor brings powerful interactive features that make formatting content faster and more intuitive. You can now access formatting tools directly where you need them, reposition images with simple drag-and-drop, and manage tables with visual controls.
You can upgrade to the new Block editor at any time in the article's ⋯ More menu, or contact support to upgrade all articles at once.
Using the Inline Toolbar
The inline toolbar appears when you select text inside most text blocks, giving you instant access to formatting options right where you're working. Here's how to use it:
- Highlight any text inside a text block
- The mini toolbar will appear above your selection
- Choose from formatting options like turning the text into a heading or list, alignment, bold, italic, underline, strikethrough, links, color, highlighting, and inline code styles
No more hunting through menus. Everything you need is right there ✨
Aligning Text
You can align paragraphs, headings, list items and the text in table cells to the left, center or right:
- Highlight the text you want to align. It can span several paragraphs or table cells
- Click the alignment icon in the inline toolbar
- Choose Align left, Align center or Align right
Everything you selected is aligned in one go. To center a whole table column, drag from its top cell to its bottom cell and choose Align center. Only that column changes.
To go back to the default, choose Align left (or Align right in a right-to-left language). Alignment isn't available in code blocks, and it doesn't carry over when your article is copied as Markdown.
Dragging Inline Images
Moving images around your articles is now as simple as clicking and dragging. To reposition an inline image:
- Click on the image you want to move
- Drag it to where you want it to appear in your article
- Drop it in the new location
The image will automatically insert itself at the new position, perfect for fine-tuning your content layout.
Enhanced Table Editing
Tables have visual controls for adding, moving and removing rows and columns. Not sure how to add a table in the first place? Check out Understanding Block Types.
Adding Rows and Columns
To add a row or column on the end of a table:
- Hover over the table
- A plus bar appears along the bottom edge and down the right edge
- Click the bottom bar to add a row, or the right bar to add a column
To add one anywhere else, use the row or column menu:
- Hover over a row or column. A small handle appears to the left of the row and above the column
- Click the handle to open its menu
- Choose Insert row above or Insert row below, or Insert column left or Insert column right
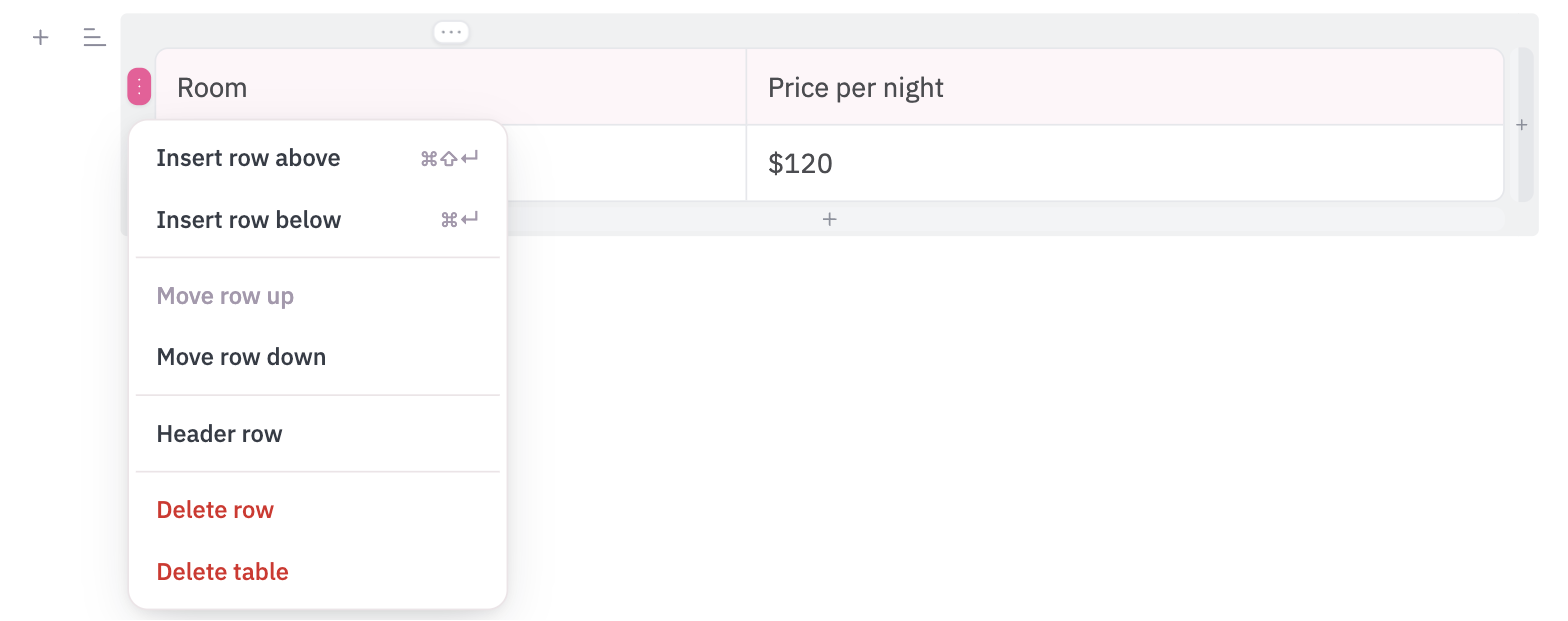
The cells the menu will change are highlighted while it's open, and your cursor lands in the new row or column so you can start typing straight away.
Moving and Deleting Rows and Columns
The same menus move and remove content:
- Move row up and Move row down, or Move column left and Move column right, shift it one place at a time
- Delete row or Delete column removes it
- Delete table removes the whole table
Resizing Columns
Drag the border between two columns to make one wider and the other narrower:
- Hover over the border between two columns. It turns pink when you can drag it
- Drag it left or right
- Let go when the columns look right
Press Escape while dragging to put the border back where it was. To go back to columns that size themselves to their content, double-click any border, or choose Reset column widths in the table's block menu.
Column widths are kept as proportions of the table, so a resized table keeps its shape on any screen, including phones. In your help center a resized table spans the full width of the article, and long words wrap inside their column. Tables you paste in from Google Docs or Word keep their column widths too.
Adding a Header Row
A header row labels your columns. It's shown in bold, and readers and screen readers see it as the table's headings.
- Hover over the first row and click its handle
- Choose Header row
You can also turn it on from the table's block menu, the handle beside the table. Choose Header row again to turn it off. The header is always the first row, so if you move or delete that row, the row that takes its place becomes the header.
These improvements make the Block Editor more responsive to how you naturally want to work with content. Less clicking through menus and more direct interaction with your articles.